Pages - Menu

Pages

Pages

Friday, 28 February 2014

Corn Lettuce Wrap: A Milky Masala Corn Snack

It’s been a while that I posted something which is healthy, not that iam not cooking anything healthy, but really having a hard time in managing the blog and my office :) but then I thought I should never give up and there comes a recipe, which is very easy and tasty snack. This is a very first recipe I am posting in my blog with Corn. In common, we use corns while making any rice pulavs or sometimes in pudding or a soup, just as an ingredient but have you ever tried anything with corn as a recipe? I guess you may not, as there are not much recipes to make with corns. This is a very unique recipe which has a sweet taste ( as its cooked with milk) as well as a little spicy.


In India, most corns are little hard even after cooking it, but I found corns here which are very soft, milky and we like even if it’s not cooked too. This is a very simple corn snack which takes about 10 minutes for you to prepare. My Amma gave me this snack recipe and I just went on making as a wrap out of it with lettuce. Interesting isn’t it. I just tried it once, and now it became a repetitive snack at my kitchen. The only little lengthy process in this is shredding the corn from the cob. It’s easier to do with hands if the corn is hard however, corns available here takes little more time to remove the corns from the cob as it is very soft,but if use a corn kerneler (if you have) or just use a knife you are all set.

As I said, its tasty as well as healthy, we all knows how healthy the corn is.

Few Nutritious Facts:

  • Corns are rich in fiber content: It has many B-complex vitamins including vitamins B1, B5 and folic acid, and its notable protein content
  • One fascinating new area of research on corn involves its potential anti-HIV activity. And also it reduces risk of hemorrhoids and colorectal cancer
  • Corn is a good source of phenolic flavonoid antioxidant, ferulic acid. Several research studies suggest that ferulic acid plays vital role in preventing cancers, aging, and inflammation in humans.
  • Further, it also contains healthy amounts of some important minerals like zinc, magnesium, copper, iron, and manganese.
  • Consuming corn is also linked to reduced signs of diabetes. Studies have shown that the consumption of corn kernels assists in the management of non-insulin dependent diabetes mellitus (NIDDM)
So, what are you waiting for, grab a cob and enjoy! :)


Ingredients:
  • Steamed Corns removed from the cob- 1 Cup
  • Milk- ½ Cup
  • Chili powder- ¼ Tspn
  • Ginger pieces- finely chopped- 2 Tspn
  • Green chilies chopped- 1 Tspn
  • Mustard Seeds- 1 Tspn
  • Lemon- small size
  • Salt- To Taste
  • Coriander Leaves- few
  • Oil- 1 Tspn
  • Asafetida- a pinch
  • Lettuce- 1 bunch


Method:

  • In a pan with medium heat pour milk, when it heats up add the corns to it and cook until the milk is dried up in the corn. Remove it and keep aside.
  • In the same pan, pour oil, when it heats up add mustard seeds and when it breaks up add the green chilies, ginger and sauté for 2 minutes.
  • Now add the steamed corns and sauté again, add chili powder,salt and asafetida and sauté for another 2 minutes and garnish with coriander leaves.
  • Switch off the flame and squeeze the lemon to it.
  • Arrange the corns to the lettuce and make a roll and enjoy as snack!
Notes:
As said, if you don’t need it as snack, you can serve just the corns. Wrapping it with lettuce is optional 


Tuesday, 25 February 2014

Authentic Lemon Pickle

OMG! I am very sure you won’t miss making it often after you taste it, as the taste is awesome.I never thought I could make an authentic lemon pickle as my Amma is an expert in making it, but believe me it came out so well and now it’s a part of everything my Bf’s meal.Pickles are made in many ways, like an instant or as an authentic. Instant pickles are very easy to make with no tedious process like my Instant Mango Pickle. This lemon pickle is something made very authentically in kerala, Yes, the total days I took for a perfect mixture was nearly 15-18 days. The making is very simple however the days for preparing it is little long, But once you make it in the beginning then you all set.

My Amma use to say that if the pickle is not authentically handled, it will surely get spoiled even while making itself. So care should be taken while handling it, such as like always use clean neat spoon (not plastic).

Since it involves more kind of a process, I had given the method as an instruction. Use only small greenish lemons and not the big one. Once you get the lemon, clean it properly and make sure that there is no mud or dust in it, this process is very essential in making a authentic lemon pickle. After washing the lemon wipe it with using a clean cotton cloth and remove the wet from it. Its very important to do that as if there is any dirt or dust may cause damage to the pickle.


Ingredients:

  • Lemon- 50 nos
  • Green Chilies- 10 nos
  • Kallu uppu(Sea Salt)- a 3/4th of the packet( if it’s a ½ kg packet)
  • Gingely Oil- 8-9 Tspn
  • Fenugreek Seeds powder- ¾ Tspn
  • Dried red chilies- 1 Cup (loosely packed)
  • Asafetida powder- 1 Tspn

Instructions:

  • Take a clean ceramic air tight container and fill the base with handful of salt After the lemon is cleaned as said above, cut the lemons as 4 pieces and green chilies as 2 slices.
  • Add about 25 pieces of lemon into the jar.
  • On top of it, add again a handful of salt and shake the jar to mix well.
  • Layer the lemons and green chilies with the salt as said with shaking in between to mix well.
  • After all set, close the container tightly.
  • Do not open the jar for about 6 days for the salt to set.
  • After the 6th day, open the jar and shake it for a minute and close again, the same way repeat the process for each day for another 10 more days (until the lemons become soft and the salt is completely dissolved and the salt is completely soaked with the lemon)
  • If you feel still the lemons haven’t become soft, leave it for another 3 more days.
  • After the 10th day, you can check the salt if its sufficient if yes, go with the final method else, add little more salt and keep for another 3 more days.


Final Method:

  • Dry roast the red chilies and grind to coarse powder (not as a fine powder just like a chilly flakes)
  • In a heating pan, add oil, when the oil becomes hot, add the fenugreek powder and asafetida and sauté for 2 minutes.
  • Add both the roasted red chili powder and the oil mixture to the soaked lemons and stir well.
  • After adding the ingredients to the lemon keep it unopened for one more day.
  • After a day, you could serve with hot rice or chappathi

Tips:

"Adjust the spice level as per your spicy need.

When ever you are serving, always use neat clean spoon.

Mix well often, as the gravy will reside at the bottom of the jar, hence before you handle, you could mix well so that you can get the gravy as well.

At some times, the lemon will not be softer even after soaking for 15 days, in that case, you can go ahead with the final method. 


After you make the pickle, its better if you keep it in the refrigerator so that the pickle stays good for many days". 


Friday, 21 February 2014

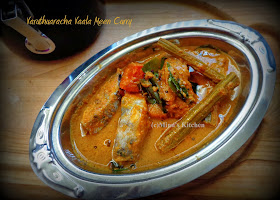
Varutharacha Vaala Meen Curry - Kerala Special Spicy Belt Fish Curry

Fish curries are very common recipe; however this is from my Amma’s cookbook. Vaala meen name it’s because that it looks like a “vaal” I,e sword. In English, it is belt fish’. The taste is absolutely awesome that anyone will love to have it. Belt fishes are not commonly available in markets in Kerala; it’s seasonable and available only in a specific time that too it’s costly when it’s sold. The taste of belt fish is very much unique and not like other fishes. It’s very spongy and melts in mouth. You can make it like the normal fish curry as well, but it doesn’t suits much to this fish.

When you make it like a varutharacha curry its perfect. Only certain fishes will be made like this roasted method as it doesn’t suits for all the fish varieties, The word “varutharachadu” is nothing but “roasted and grinded”, so the masalas are roasted and ground as a paste in this recipe and that’s how it took the name. There is not a huge difference in making this than the normal Kerala fish curry but there is a difference in taste. If you are a fish lover, I would suggest you to taste the belt fish curry at least ones and you will love the taste of it. Even if you make a fry out of it, it tastes great. So, here comes the authentic belt fish curry.


Ingredients:

To Roast (without oil):

  • Chili Powder- 1 Tspn
  • Coriander Powder- 1 Tspn
  • Turmeric Powder- ¼ Tspn
To Grind:

  • Coconut Shredded- half cup
  • Small onions- 3 Nos
  • Tamarind- half lemon size.
  • Cumin Seeds- ¼ Tspn
For the Curry:
  • Belt Fish- 1 Lb/ ½ Kg
  • Tomato-Sliced as large pieces- 1
  • Green Chilies- 3 Nos(Sliced lengthy)
  • Uluva podi(fenugreek powder)- ¼ Tspn
  • Drumstick(optional)- 1 sliced
  • Salt- As needed
To Temper:
  • Coconut Oil- 1 Tspn
  • Mustard Seeds- 1 Tspn
  • Curry Leaves- Few


Method:

  • Roast all the ingredients in low flame in a pan, until the color of the masala powders turns thick and switch off the flame and let it cool.
  • Grind all the ingredients under to ground along with the roasted powder adding little water and make a fine paste.
  • In a pan without keeping it in the flame, add all the ingredients under for the curry (except fenugreek powder) and the grounded paste along with the required water you needed for the curry and mix well with hand.
  • Keep this pan into the stove now and cook it covered for 5 minutes and then cook it uncovered, when it starts boiling add the fenugreek powder and stir well (do not over stir).
  • In a separate small pan, add all the ingredients under to temper and when it’s done, add this to the boiling curry and switch off the flame.
 
Tips:

"Do not add more water as the curry will not taste good; add only required water say 1 cup, so that when its starts thickening, you may not lose the taste.

Adding kudampuli is a good choice for any Kerala fish curry, if you are adding kudampuli, do not add the tamarind while grinding, as you can add only the kudambuli directly to the curry when it’s boiling.

Roast the powders well until the color turns thick, only then the curry will turn good."


Tuesday, 18 February 2014

Crab Pepper Fry

This is another recipe of crab, next to my Crab Roast Curry post. It’s similar how we made in the curry, but we have to let the curry and the masala to stay long in the stove to make it dry and to form as a fry texture. Crab recipes are mainly made at families when someone in home falls sick with cold/running nose, as having it at that time cures that than any other medicine, and if you prepare the crab with more pepper then it’s absolutely useful, as it’s spicy and tasty as well.

I have never seen such a big crab at sea food markets at India, while here in California it’s so big and the total size was measuring 6 to 6 ½ inches in size. It’s Huge and very hard as well, most Indian crabs are soft that you could break it by your teeth however this one is something you need a crab cracker, seafood scissor or a wooden mallet to break it. The hardest portion is the cleaning process, however if you once see a trial videos in YouTube if you are a first time to prepare crab, then you could make it as a practice and its worth doing as the taste is absolutely awesome :)


Ingredients:

  • Crab- 1 Large or if using small – 3 Nos
  • Onion- sliced- half cup
  • Tomato-1 Large
  • Pepper powder- 1 Tspn
  • Turmeric Powder- ½ Tspn
  • Coriander Powder-1 Tspn
  • Garam Masala- 2 Tspn
  • Coriander Leaves-few
  • Curry Leaves- Few
  • Mustard Seeds- 1 Tspn
  • Coconut Milk- ¼ Cup
  • Green Chilies- 3 Nos
  • Ginger garlic paste- 1 Tspn
  • Oil- 5 Tspn
To roast and grind as fine paste:

  • Small onions- 3
  • Coriander Powder-1/2 Tspn
  • Chili Powder - ½ Tspn
  • Turmeric Powder- 1/4 tsp
  • Fennel seeds - 1/2 Tspn
  • Pepper Seeds- 2 Tspn
  • Curry Leaves - 10 Leaves
  • Oil – 2 Tspn


Method:

  • In a pan, roast all the ingredients under to grind as fine paste, let it becomes cool and then grind everything to a fine paste and keep aside.
  • In a separate pan, pour oil, add curry leaves, mustard seeds and ginger garlic paste, green chilies and sauté for 2 minutes.
  • Add the sliced onions and the ground masala paste and sauté again until the masala smell goes from it and then add the tomato to it and sauté well.
  • Add all the masala powders listed in the ingredients and sauté well until the masala smell goes from it.
  • Add the crabs, salt and mix well with ladle. Pour ¼ of water and cook it covered until the crabs are cooked.
  • After the crab is cooked well, add the coconut milk and sauté well until the masala dries up completely.
  • Garnish with coriander leaves and serve hot.

 
Tips:

"Do not leave the crab to cook more time after you add the coconut milk as it may not taste good.

Adjust the spice level as per your spicy level.

Before you add the masala powders make sure the onion, grounded paste and tomato are fully pulped so that the gravy will taste good and gets well I into the crab."

Tuesday, 11 February 2014

Kerala Special Fish Tapioca Cutlet

I know you may wonder I am posting lot of tapioca recipes in my blog, the reason being its used most often in Kerala families and its absolutely tasteful in anything you make with, but this recipe is something you will definitely love to have many, as its made of both the fish as well as the tapioca. You could use any type of fish for it. The process is very simple except removing the skin from the tapioca and cutting it into pieces, however if you don’t need tapioca in it, you could ignore using it and make with just the fish.

Cutlets are mostly liked by most of them, and even kids love it, if made it with less spice. Cutlets are common recipe, and fish cutlet is little more common however, just think of a fish and tapioca together in a cutlet. . Sounds interesting rite..yes we are using tapiocas to it, it gives a wonderful taste just like the potatoes in the veg cutlet. This delicious cutlet can be served as a patty or eaten as an appetizer or as a substantial meal; with no further delay here you go with the making :)


Ingredients:

  • Any Fish (boiled and bones/skin removed) Shredded- 1 ½ Cup
  • Tapioca- 1 Medium (skin removed and cut into medium size pieces)
  • Onion- 1 finely chopped
  • Ginger- a small pices finely minced
  • Garlic-2-3 pods chopped
  • Green Chilies- 3 Nos Chopped finely
  • Chili Powder- 1 Tspn
  • Turmeric Powder- ¼ Tspn
  • Coriander Powder- 1 Tspn
  • Pepper Powder- ½ Tspn
  • Garam Masala- 1 Tspn
  • Chopped curry leaves- few
  • Bread Crumbs- 1 Cup
  • Mustard Seeds- few
  • Cumin Seeds- few
  • Salt- To Taste
  • Oil- To Deep Fry

Method:


  • In a pressure cooker, add the tapioca and 1 cup of water and cook for 3 whistles.
  • After its cooked well, smash it all together just like how you smash potatoes and keep separate.
  • In a pan, pour oil, add the mustard,cumin seeds,chopped curry leaves and sauté.
  • Add the chopped ginger, garlic, green chilies and sauté again for 2 minutes.
  • Add the onions to it and sauté well until it becomes translucent.
  • Add all the powders mentioned in the ingredients and salt and sauté again.
  • After the masala smell goes from it, add the shredded fish to it and sauté again.
  • Bring to low flame and add the smashed tapioca and mix everything well.
  • After it sets cool, make shape out of it (your desired shape either as round, heart or oval), dip into the egg and spread the bread crumbs on the both sides and deep fry it until both the sides turns golden brown.


Tips:

"If you are finding hard to mix the smashed tapioca with the fish ingredient, switch off the flame, let it become cool and then mix it by hand.

Adjust the spice level as per your spicy level.

Oil should be medium hot when you drop the cutlets else it will darken the cutlets.

As I said it’s your choice, if you need just the fish cutlet you could ignore adding the tapioca to it.

You can make it with any fish variety but look for fishes in which bones can be easily removed, fishes like sardines may give little difficulty as it may have small bones which are not easy to remove."

Friday, 7 February 2014

Vendakai Vathal / Okra Fries

I never thought I could make something good with okra, as I was not such an expert in cooking with okra until I make this. This is a very simple, and much tasty fries which can be served with any rice varieties or you could have this as just as a snack. In normal vendakai fry, we use to add just the masala powders and deep fry it however, in this there is a small difference in the ingredients. All you need is just to marinate everything and keep it for at least ½ hour for the ingredients to set well with the vendakai.

Okras are rich sources of dietary fiber, minerals, and vitamins; often recommended by nutritionists in cholesterol controlling and weight reduction programs. This recipe is healthy as well as tasty, but as much as you reduce the volume of oil used is good. Iam sure you all will like and try this at your kitchen :) Here you go with the making.


Ingredients:

  • Okra- 300 Grams
  • Corn Flour- ¾ Tspn
  • Rice Flour- 2 Tspn
  • Chili Powder- 1 Tspn
  • Coriander Powder- 1 Tspn
  • Curd- 1 Tspn
  • Turmeric Powder- ¼ Tspn
  • Asafetida powder- ¼ Tspn
  • Salt- To taste
  • Oil- To Deep fry

Method:

  • Marinate the okra with all the ingredients except curd and oil with spraying little water.
  • In the boiling oil, add the marinated okra to it and deep fry.Flip both the sides for even cooking.
  • In the middle before it gets cooked, add the curd and continue frying it.
  • After it turns golden brown, transfer to the paper towel and serve.


Tips:

"Add only little water just like spraying while mixing all the ingredients with okra.

You can add few curry leaves, however it’s optional.

Do not cook for long time in the oil, as it may get burnt. Deep fry it until it becomes lite and crispy."

Tuesday, 4 February 2014

Meen (Mathi) Achar - Kerala Fish Pickle

I believe there is no introduction needed for this recipe, as anyone from any region in India knows how good the fish pickle made in Kerala. My amma use to make fish pickle out of mathi (sardine) or by chura (Tuna).I prefer making it in Sardine as it is rich in vitamins and minerals however in Tuna, its high in the mercury content. You could make it in any fish of your choice. The making of meen achar is very simple but you have to be very careful while making the choice of the fish that you gonna make with, as it should thick and should not get smudged when you cut them into small pieces. Some makes it by just cutting it to small pieces and others remove the bones in it.Even if you use with the bones will not harm you as we gonna deep fry the fish pieces, hence the bones will not hurt you when you have it.

Once you make it, store in a ceramic or glass air tight container as my amma stores it in “bharani” and care should be taken every time you use it, as it may get spoiled if you are using a wet spoon. If used properly you can keep it for more than a month also. Meen achar are very tasteful to have with any rice variety or chappathi. Its spicy and absolutely tasty and I bet you will make it often at your kitchen. Here you go with the making.


Ingredients:

To Marinate:

  • Sardines- 1 Lb/ ½ Kg (Cut into small pieces, Removing the bones is preferable or its optional)
  • Kashmiri Chilli Powder- 1 Tspn
  • Uluva podi (Fenugreek seeds powder) – 1/4 Tspn
  • Kaaya podi (Asafoetida powder)- ½ Tspn
  • Turmeric Powder- ½ Tspn
  • Pepper powder- 2 Tspn
  • Roasted Curry Leaves- Few
  • Salt- To Taste
To make gravy:
  • Vinegar- ½ Cup and 2 Tspn as separate
  • Kashmiri Chilli Powder- 3 Tspn
  • Ginger and garlic – half cup sliced
  • Mustard Seeds- 1 Tspn
  • Gingely Oil- ½ Cup
  • Cumin seeds- ¼ Tspn
  • Green chilies- 5 Nos(sliced lengthy)
  • Water- ½ Cup
  • Fresh Curry Leaves-Few
 

Method:

  • Marinate the fish with all the ingredients under to marinate and keep for at least 1 ½ hours in refrigerator.
  • Make a paste of the 2 tspn of vinegar and the Kashmiri chili powder(3 Tspn) and keep aside.Add water if needed.
  • In a pan, pour the oil, when it heats up add the marinated fish and deep fry until it turns little crisp,transfer to a paper towel and keep aside.
  • In a separate pan, pour the fish roasted oil, when it heats up add the mustard,curry leaves,ginger,garlic,green chilies and curry leaves and fry for a minute.
  • Add the prepared paste to this and stir well for 2 minutes until the masala smell goes from it.
  • Add the ½ cup of vinegar and water and let it boil for 10 minutes until it turns thick.
  • Add the fried fish pieces to it and stir well again to combine everything and add kaya podi(asafetida) at the end.
  • Switch off the stove,let it turn cool and transfer to the air tight ceramic/glass container.


Tips:

"Always keep the flame as medium low and care should be taken as it should not burnt at the bottom or middle.

Adjust the chili powder as per your spicy level.

If you feel there should be little bitterer taste needed, add some more vinegar at the end and stir again.

Cook in the stove until the desired gravy is desired, as some may like the gravy in it. I dried up everything as I needed as thick.

As mentioned at the beginning store in a clean ceramic/ glass container which preserves the pickle for longer time."